Filters
Sponsors
Warranty
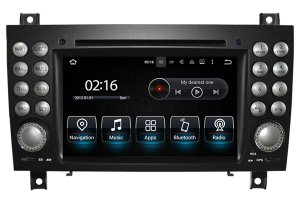
Mercedes-Benz SLK(R171) 2004-2010 radio Upgrade with 7\" screen
Mercedes-Benz SLK(R171) 2004-2010 radio Upgrade with 7" screen
[MB-8801]

Price: $449  $375
Save: 16% off

Date Added: 03/31/2021 by Mark Brink
This is my Second order, we sold the SLK280, and got a 2006 SLK350. OEM radio would turn on by itself wearing down battery, CD did not work, No Bluetooth, no Back up Camera, all requirements requested by my Wife.
My STG-1 Radio had two small ports which required a overly long 9' Loom, that could have been easily reduced to 2', that cost another $59 to properly connect this radio to the amp in the passenger foot well. I pitched a fit and was not happy, because my first purchase was a direct fit that did not require all the additional work in the foot well. Hindsight I figured it out, and hopefully they post the picture of the proper hook ups to the amp with this long ass loom. I tried to attach it and could not.
Here is the link for removal of the Radio and simply reverse instructions to install it ,takes 10 minutes to remove. Click on Skip Ads to get to it on the right side bottom.
https://www.youtube.com/watch?v=m_gf0Lgi_HY

To get to the amp, I had to remove 3 screws (all screws are T20 torx for the whole installation including dash), anyway to remove the plastic tray under dash and immediately above your feet on the passenger side footwell. There is a 12v female plug that you will take a small screwdriver and simply press down on the 90 degree connector, no squeezing involved. at the seam nearest you, you simply pop it straight out from the transmission hump side which has a small clip. There is a vent connected that you will have to remove after removal to reinstall, it is best to squeeze the attachments and pull up on each one and put a spacer like a nickel under them as you go along to prevent them from reconnection to remove vent and install it before you attempt to reinstall this piece and work it to proper fit, will have to wiggle it into position to align screw holes, but before you reinstall the 3 front screws you will have to snap the attachments of the vent to this upper plate, then screw it in.
NOTE:
If you think you can pass the wires from the Radio Console to the footwell, just remove the clip section at the seam of transmission hump and pull it back far enough to pass the very long loom to the footwell and the USB and the Back up camera looms, It is flexible use common sense and don't force it further than needed. I believe you would not have to remove the upper plate afore mentioned and save some time and headaches. I wanted to see everything and went a step further imo.
The carpet after removal of the Floor mat, you simply reach up to the top of the carpet at the firewall and pull back as far as it will let you, that is protected by a styrofoam shield that you grab at the top and just wiggle it up till it releases from the bottom metal protector clips. which is just barely enough to get to the 3 plastic 10mm nuts that hold the metal amp protector, 1 top facing you and two more at bottom of metal protector. This will reveal the Amp!
My Radio STG-1 had two simple hook ups, this Carnaviplayer stereo had several, had to buy a 9' Loom that connects stereo to passenger foot well located amp, which used the top two connectors on Right side, and the top left one and antenna plug on left side bottom, which you have to force fit but will connect to get the radio
As far as the GPS antenna after finding the port on the back, I ran the wire up on the left side and put it on top of my speaker about 6" exposed cord and squeeze fit it in the crack on the vent to drivers side dash, it is magnetic and has not moved on its position on the speaker grill yet.
Count the male prongs to the female receptors for proper location of their supplied cords, which you will have many left overs that don't apply to this stereo but possibly other radios by Mercedes.
I just ran the USB cables down the passenger side to the woven basket storage area and the back up cable as well.
Upon mentioning the back up camera cable my SLK of course is a Hard top convertible and I tried finding and area to drill for the pass through of the cable, and after removal of the trunk plate behind the tag on the underside of the lid and a thought of passing through the same hole on the drivers side main connector close to the hinge, I have decided that I will again pull back the carpet in the upper area firewall on the left of the amp area of the passenger footwell, and pass them through there and silicone after completion of connection. I then will remove the two plastic scrub plates on the underside of the car on the passenger side and zip tie some areas, run it to the back and install my camera on the gas tank scrub plastic plate located at the very rear and aim the camera from there (all underneath no bumper or tag areas drilled).
I used a screw gun to remove everything and if you use a screw gun to reinstall everything, make sure you go slow and put the clutch on 1, I suggest hand driven installation (some one broke a couple clips by over tightening mine from the previous owner days!)
It is Plastic people only snug not tight!
Closing comments: You can do it!
My CANBUS BOX toggle settings were preset all in the top position ready to use and the did not inform we of this and I used the sticker locations for SL series which was 2 up and 2 down, and when I mentioned I was having some issues they decided to let me know they preset it, a note or email would have been helpful.
They put up with me and kept in contact, just have to wait until China time to communicate around 6 pm as I recall.
They must have done improvements in the last two years, this upgrade is superb!
Only complaint screen is hard to read in the daylight, maybe they can email me instructions to make it more visible.
I would suggest this product to DYI types and save a thousand bucks! I think my total bill was $550 with shipping.
Go To This Product's Details   Read More Reviews   Write Review